IOS: Do Not Disturb Mode

There is a neat setting on most I phones if not all that allows users to manage and block incoming calls while busy with work or business. The Do Not Disturb Mode setting on I phones lets users manage and block calls. The following steps will show you how to access and use this setting effectively.

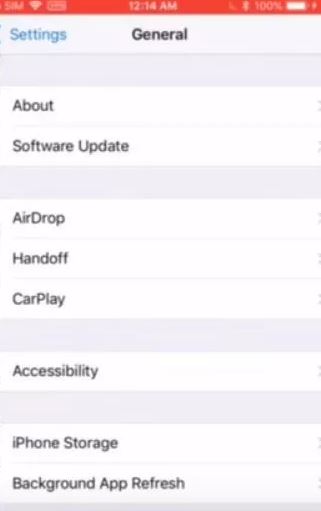
Step 1: Access your home screen on your I Phone.

Step 2: Access settings on your I phone’s Home screen.

DND 2

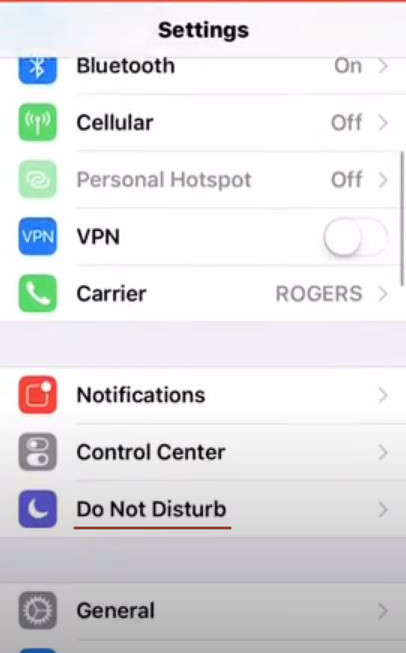
Step 3: Navigate to your Do Not Disturb Mode setting on this screen.

DND3


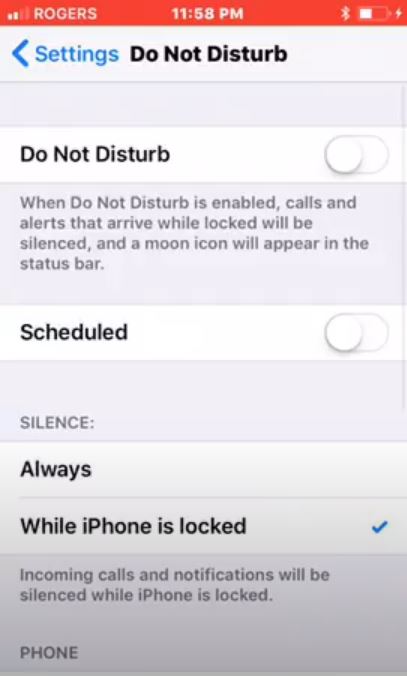
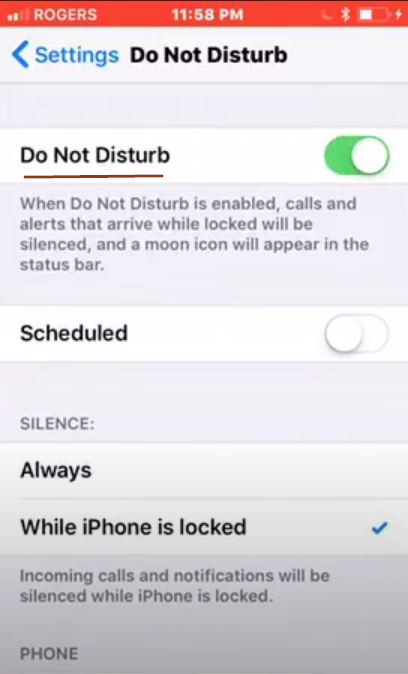
Step 4: Turn ON your Do not Disturb Mode by moving the slider to the right. At this point, all calls and notifications that arrive while the phone is locked will be silenced.

DND 4

As you may have noticed, there is an option to schedule your Do Not Disturb Mode setting. This option has many applications like Work time, Bed time, Driving etc.

Step 5: Turn the Scheduling option ON by moving the slider to the right.

DND 3

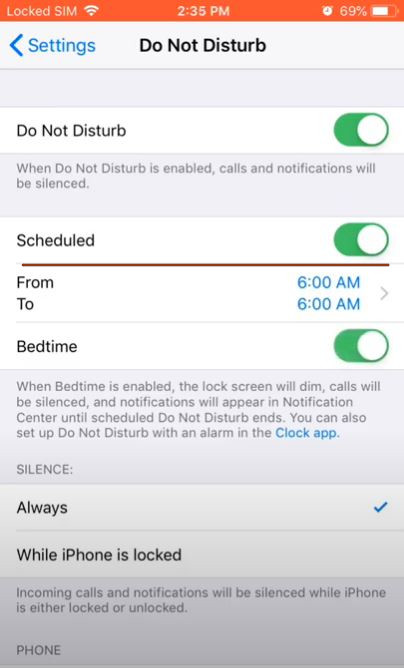
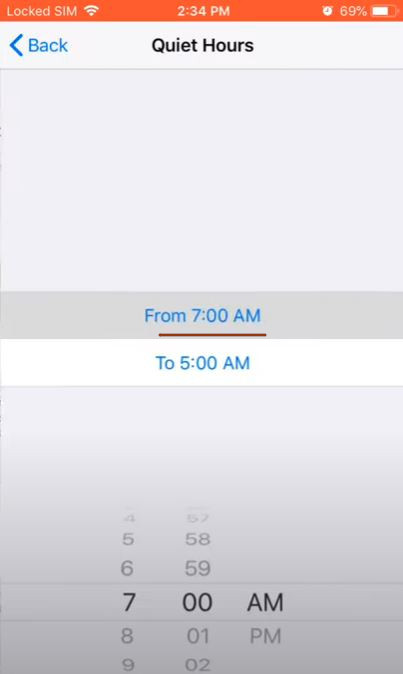
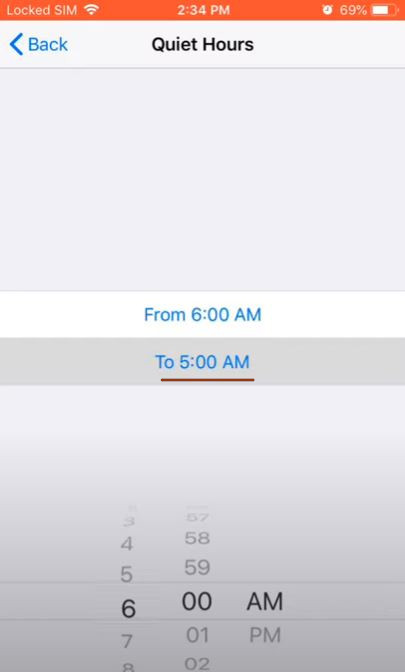
Step 6: Set the hours for Scheduled Do Not Disturb Mode.

DND 6

DND 7

DND 8

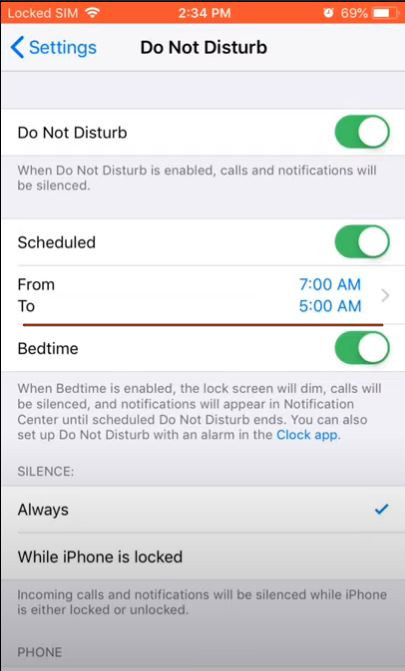
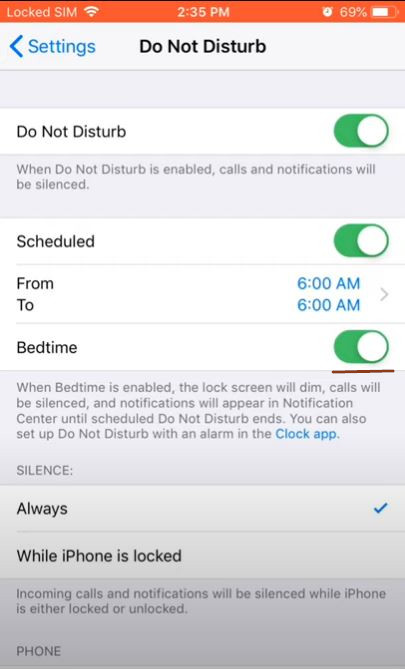
Step 7: Turn ON Bed time if you need to silence your calls.

DND 9

DND 10

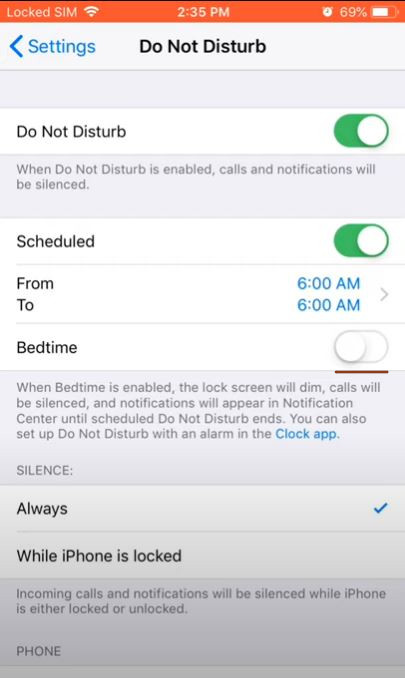
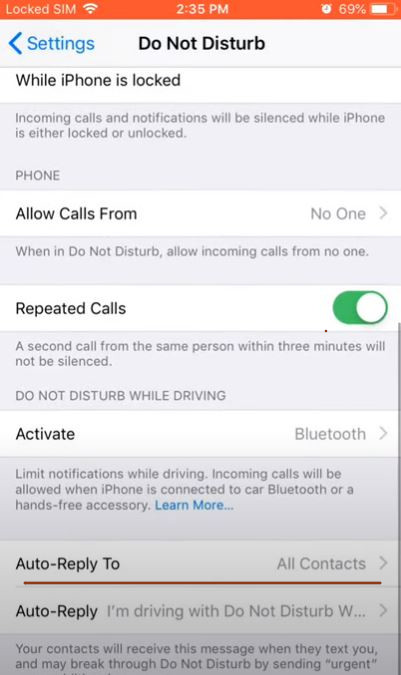
Step 8: Change the Silence settings to either Always silenced or silenced only while the I phone is locked. Should you need to silence your phone even while your I Phone is not on lock screen, you may use the Always Silenced option. If not, you may use the “While I phone is locked” option to silence your calls and notifications while your phone is on the lock screen.

DND 11

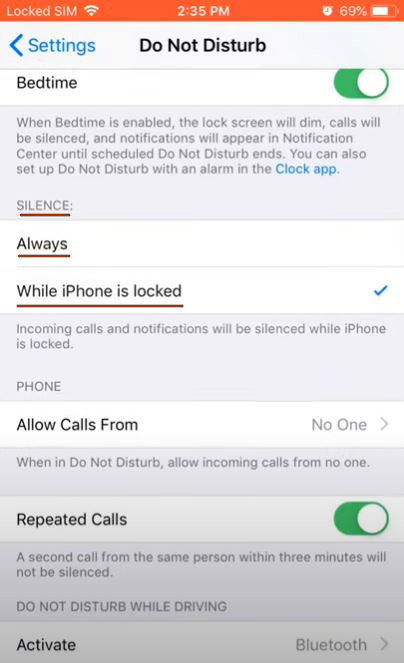
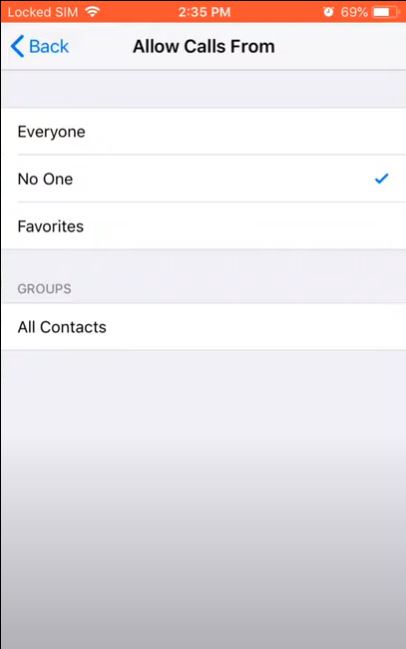
Step 9: Navigate to Allow Calls From and change this option to either “Everyone“, “No One“, “Favourites“, “All Contacts“.

DND 14

DND 12

Step 10: Should you have an Employer or Business Contact on the list, you may turn ON the Repeated Calls option. This option lets a second call from the same person go through. This option is great for emergencies.

DND 18

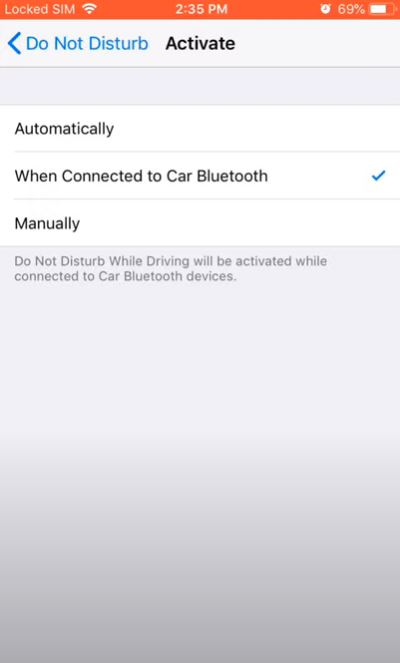
Step 11: You may now access the Do Not Disturb While Driving option on this screen. This option is perhaps one of the most useful setting on this screen. Should you have a GPS or blue tooth enabled device connected to your phone, this option will silence your calls and notifications as soon as you turn your GPS ON and activate your Bluetooth device.


DND 18

DND 15

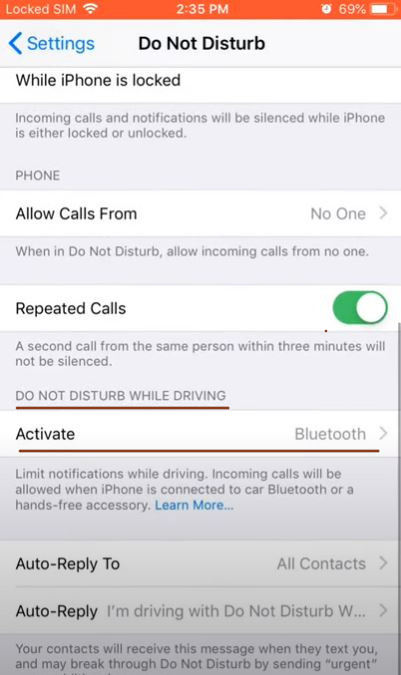
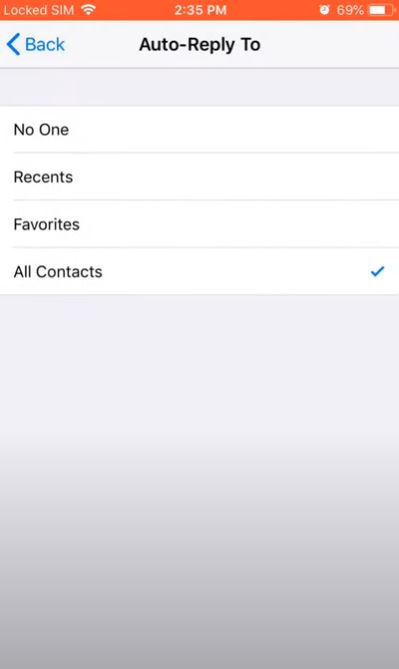
Step 12: Should you need to let your callers or contacts know about your status, whereabouts or the reason why you are not able to attend their calls, you may use the Auto-Reply setting on this screen. You may also choose your own message for this reply!

DND 18b

DND 19

DND 21


Advertisement

IOS: Set up a SMSC Number

 SMSC number stands for Short Messaging Service Center Number. When a user sends any SMS, this SMS goes through a SMS service center before it is finally diverted to its destination. Think of SMS service centre as a gas station service stop on your way to your final destination. Since, SMS service centres are different for each service provider, service center number for each service provider will be different. If this number does not match with what you may see on the screen, one will have to contact customer/tech support to get the dialing sequence to set their SMSC number. One does not need the SMSC number set up to receive SMS. Without this SMSC number, one will not be able to send a single SMS! You may refer to the following steps to set up your SMSC number for Chatr.

Step 1: Check your SMSC Number. Check to see if your SMSC number is set up correctly on your phone by dialing a sequence of digits provided by your network service provider.

Step 1

Step 2

Step 2: If your SMSC number is not set up correctly, type in a sequence to set up your SMSC number. You may request this sequence from your network service provider.

Step 3

Step 3: Make sure you see the following screen. If not, try again with the correct sequence.

Step 4

Step 4: Check your SMSC number again.

Step 5

Step 6

Step 5: Go ahead and send a text message/SMS.

Step 7

Step 7A

Android: Set up a SMSC number

   SMSC number stands for Short Messaging Service Center Number. When a user sends any SMS, this SMS goes through a SMS service center before it is finally diverted to its destination. Think of SMS service centre as a gas station service stop on your way to your final destination. Since, SMS service centres are different for each service provider, service center number for each service provider will be different. If this number does not match with what you may see on the screen, one will have to contact customer/tech support to get the dialing sequence to set their SMSC number. One does not need the SMSC number set up to receive SMS. Without this SMSC number, one will not be able to send a single SMS!

STEP 0 B

Step 0C

You may refer to the following steps to set up your SMSC number for Chatr.

Step 1: Navigate to your messages on your Android.

Step 2: Use the Menu button on your phone to bring up message settings on your phone.

Step 1

Step 3: Navigate to your SMS settings.

STEP 2

Step 4: Access your text message settings.

Step 3a

Step 4

Step 5: Click on SMS service center option on this screen. Type in the SMS service center number for your network service provider.

Step 6

Step 6: Once this number is set up correctly, you may proceed to send text messages.

Step 0D3

Step 0D4

Step 0D5

Android: Unlock SIM using PUK code

When your device is locked to a certain carrier, you will need a phone unlock code or a network unlock code. This unlock code is for you to unlock your smart phone to all carriers. Once you unlock your phone to all carriers, you will then be able to use a SIM card from any carrier! However, should your SIM be locked, you will need a PUK code. This code is for you to unlock your SIM card! SIM card does not get locked by itself but rather gets locked when one sets up a SIM Pin for their SIM card under their phone settings and enters that PIN incorrectly too many times! Usually, one gets prompted to enter their SIM PIN only after their phone had been inactive for quite some time or if they rebooted their device. Following are the steps to set up a SIM PIN and unlock your SIM using your PUK Code….

Step 1: Should you be prompted to enter your SIM PIN for security, enter your four digit SIM PIN.

Step 1

Step 2: Keep trying until you unlock the SIM with a correct PIN.

Step 2

Step 3

Step 4

Step 3: Once you’ve made five attempts or so, you’ll be requested to enter a PUK code. Call your network service provider to get this code!

Step 5

Step 4: Type in an eight digit PUK Code.

Step 6

Step 5: Set up a new SIM PIN.

Step 8

Step 9

Step 6: Confirm the new SIM PIN.

Step 10

Step 7: Test your new SIM PIN by typing it once more.

Step 11

Step 8: At this point, you’ve successfully unlocked your SIM PIN. You may start using your device as usual.

Step 13

IOS: Unlock SIM using PUK code

When your device is locked to a certain carrier, you will need a phone unlock code or a network unlock code. This unlock code is for you to unlock your smart phone to all carriers. Once you unlock your phone to all carriers, you will then be able to use a SIM card from any carrier! However, should your SIM be locked, you will need a PUK code. This code is for you to unlock your SIM card! SIM card does not get locked by itself but rather gets locked when one sets up a SIM Pin for their SIM card under their phone settings and enters that PIN incorrectly too many times! Usually, one gets prompted to enter their SIM PIN only after their phone had been inactive for quite some time or if they rebooted their device. Following are the steps to set up a SIM PIN and unlock your SIM using your PUK Code….

Step 1: Set up a SIM PIN under your phone settings

PUK Code 17

Step 2: Should you be prompted to enter your SIM PIN for security, enter your four digit SIM PIN.

PUK Code 1

PUK code 2

Step 3: Keep trying until you unlock the SIM with a correct PIN.

PUK Code 3

PUK Code 4

Step 4: Once you’ve made five attempts or so, you’ll be requested to get a PUK code from your carrier.

PUK Code 5

PUK Code 6

PUK Code 7

Step 5: Call your network service provider to get your PUK code. Your PUK code will be eight digits or so.

Step 6: Enter your PUK Code.

PUK Code 9

Step 7: Choose and Enter a new SIM PIN. Your SIM PIN for your IPhone will be four digits or so.

PUK Code 11


PUK Code 15

Step 8: Make sure you see the following screen on your device. At this point, you’ve successfully unlocked your SIM and set up a new SIM PIN.

PUK Code 16

PUK Code 17

How to Set Up MMS Settings on iPhone

In order to send pictures and videos from a smartphone, one needs to have MMS as part of their cell phone plan. Also, one needs to have their MMS settings set up correctly on their phone! Following are the steps to set them up on an Iphone.

Step 1: Navigate to your phone settings. Make sure your WIFI setting is turned off.

STEP 1

Step 2: Make sure cellular data is turned on. Check if you are able to access your data.

STEP 2

Step 3: Navigate to your messages settings.

Step MMS 1

Step 4: Make sure MMS messaging is enabled.

MMS 3


Step 5: Send a picture/photo from your phone to test your MMS settings. You may send this picture/photo to your own phone number as a test.

MMS 5

Step 6: Check if this MMS message has been delivered.

MMS 4

Step 7: Check if this message has been read.

Step 2